Getting Started

Installation#

Spigot plugin#

To use resquare on the server you can download our spigot plugin, this jar file included all the dependency libraries it needs.

In addition, we provided a visualized debugger spigot plugin for the developers, we recommend you to download it as it can help you a lot in inspecting the UI.

Download the latest jar with suffix -all.jar from following links:

caution

You should not enable the debugger on your production server, as it will have extra overhead.

Development dependency#

Gradle#

repositories {
maven {
url = URI.create("https://oss.sonatype.org/content/repositories/snapshots/")
}
}
dependencies {
compileOnly("dev.reactant:resquare:0.0.1-SNAPSHOT")
}

Remember to add resquare into your plugin.yml

Create your first UI#

In resquare, a component can be anything, such as a button, progress bar, or items list.

Let's declare our first component like the following.

Declare component#

In resquare, component can be anything, such as button, progress bar, or items list.

Let's declare our first component like the following.

import dev.reactant.resquare.dom.*;
import dev.reactant.resquare.elements.*;
// declare your component at top level
val foodStoreApp = declareComponent {
div(DivProps(
style = styleOf {
width = 100.percent
height = 100.percent
padding(1.px)
},
item = ItemStack(Material.WHITE_STAINED_GLASS_PANE)
))
}

After that, we can create a UI with the component, and open the inventory to a player.

// whenever you want to show the ui, here we use command as an example
override fun onCommand(sender: CommandSender, ...): Boolean {
if (command.name.toLowerCase() == "..." && sender is Player) {
createUI(foodStoreApp, 9, 6, "Food Store").openInventory(sender)
}
}

Now, you can try to run the above code and see can you view a 9x6 inventory filled with white glass panes.

Nested div and Separated styles#

Most of the time we will need to nest different div or components to make a complex UI. In Resquare, we can wrap them with childrenOf() and pass it into children.

It is not ideal to mix so many style code inside the structure, because it will make our code hard to read. To make the structure better, we can declare the style in another object and reuse them.

// component owns styles should be private
private val styles = object {
val container = styleOf {
width = 100.percent
height = 100.percent
padding(1.px)
}
val foodItem = styleOf {
width = 1.px
height = 1.px
}
}
val foodStoreApp = declareComponent {
div(DivProps(
style = styles.container,
item = ItemStack(Material.WHITE_STAINED_GLASS_PANE),
children = childrenOf(
div(DivProps(
style = styles.foodItem,
item = ItemStack(Material.CAKE),
)),
div(DivProps(
style = styles.foodItem,
item = ItemStack(Material.BEEF),
)),
)
))
}

Event handler#

If you try to run the above UI, you may find that you can take away the glass or food from the container without paying, this is not what we want! To prevent this, we can use the useCancelRawEvent hook to cancel all click and drag events in this UI.

As we would like to let the player click the food item to buy it, we will also set a callback into onClick to handle the food item click event. Don't worry will useCancelRawEvent affect the onClick, event propagation will keep going after the event canceled.

Bukkit listener?

Please remind that you should not use bukkit listener to handle Resquaure UI event, because it may cause unexpected behavior. Resquare has its own way to handle events, you can check the event section to get more information about it.

val foodStoreApp = declareComponent {
// cancel all click and drag event
useCancelRawEvent()
val handleCakeClick = { event: ResquareClickEvent ->
event.whoClicked.sendMessage("Buy cake")
}
val handleBeefClick = { event: ResquareClickEvent ->
event.whoClicked.sendMessage("Buy beef")
}
div(DivProps(
style = styles.container,
item = ItemStack(Material.WHITE_STAINED_GLASS_PANE),
children = childrenOf(
div(DivProps(
style = styles.foodItem,
item = ItemStack(Material.CAKE),
onClick = handleCakeClick,
)),
div(DivProps(
style = styles.foodItem,
item = ItemStack(Material.BEEF),
onClick = handleBeefClick,
)),
)
))
}

Extract and reuse component#

Now we have a UI component with 2 similar buttons, but it doesn't sound a good idea to put all logic into 1 component, and we have no way to reuse the food button logic yet.

Therefore, we need to extract the food button as an independent component, so that we can reuse it in our ui component. Remember to set the internal component and its props class as private to encapsulate your UI.

// A props data class defined what variable should be pass to foodButton
private data class FoodButtonProps(
val food: ItemStack,
val price: Double,
val onSold: (() -> Unit)? = null, // we will use this later
)
// since food button is only for this ui, so set it as private
private val foodButton = declareComponent { props: FoodButtonProps ->
val handleClick = { event: ResquareClickEvent ->
// call your favourite economy api here
if (withdraw(event.whoClicked, props.price).isSuccess) {
// for simplicity, we don't care is the backpack full
event.whoClicked.inventory.addItem(props.food)
props.onSold?.invoke()
}
}
div(DivProps(
style = styles.foodItem,
item = props.food,
onClick = handleClick,
))
}
val foodStoreApp = declareComponent {
useCancelRawEvent()
div(DivProps(
style = styles.container,
item = ItemStack(Material.WHITE_STAINED_GLASS_PANE),
children = childrenOf(
foodButton(FoodButtonProps(
food = ItemStack(Material.CAKE),
price = 20.0,
)),
foodButton(FoodButtonProps(
food = ItemStack(Material.BEEF),
price = 15.0,
))
)
))
}

List rendering#

To render a list of elements, we can use a + to wrap the list. You can use list render to iterate multiple elements with different props.

data class FoodPrice(val food: ItemStack, val price: Double)
data class FoodStoreAppProps(
val foodPriceList: ArrayList<FoodPrice>
)
val foodStoreApp = declareComponent { props: FoodStoreAppProps ->
useCancelRawEvent()
// you can use useState to create an component variable
// it will keep until you use setter to change it or the component unmount
val (foodPriceList, setFoodPriceList) = useState(props.foodPriceList)
val handleFoodSold = { index: Int ->
foodPriceList.removeAt(index)
// use setter to update the state, it will trigger UI re-render
setFoodPriceList(foodPriceList)
}
div(DivProps(
style = styles.container,
item = ItemStack(Material.WHITE_STAINED_GLASS_PANE),
children = childrenOf(
// don't forgot the plus (+), it is a magic to convert list into node
+(foodPriceList.mapIndexed { index, foodPrice ->
foodButton(FoodButtonProps(
food = foodPrice.food,
price = foodPrice.price,
onSold = { handleFoodSold(index) }
))
})
)
))
}

Because we have added props type for foodStoreApp, so we have to call the createUI with props.

val props = FoodStoreAppProps(foodPriceList = arrayListOf(
FoodPrice(food = ItemStack(Material.CAKE), price = 20.0),
FoodPrice(food = ItemStack(Material.BEEF), price = 15.0),
))
createUI(foodStoreApp, props, 9, 6, "Food Store").openInventory(sender)

Now you should be able to buy the food by clicking the items in the inventory, and the inventory will be removed after sold.

Flex layout#

2 items are not enough to fill our store! Let's try to add more food items into the food store.

val props = FoodStoreAppProps(foodPriceList = arrayListOf(
FoodPrice(food = ItemStack(Material.CAKE), price = 20.0),
FoodPrice(food = ItemStack(Material.BEEF), price = 15.0),
FoodPrice(food = ItemStack(Material.COOKED_BEEF), price = 17.0),
FoodPrice(food = ItemStack(Material.APPLE), price = 3.0),
FoodPrice(food = ItemStack(Material.EGG), price = 4.5),
FoodPrice(food = ItemStack(Material.COOKIE), price = 4.0),
FoodPrice(food = ItemStack(Material.BREAD), price = 8.0),
FoodPrice(food = ItemStack(Material.PORKCHOP), price = 14.0),
FoodPrice(food = ItemStack(Material.COOKED_CHICKEN), price = 14.0),
))
createUI(foodStoreApp, props, 9, 6, "Food Store").openInventory(sender)

Now we have 20 foods in our store, then let's try to run and see the result... Oops, some item buttons were gone! In this case, we can try to use the style inspector to see what is happening.

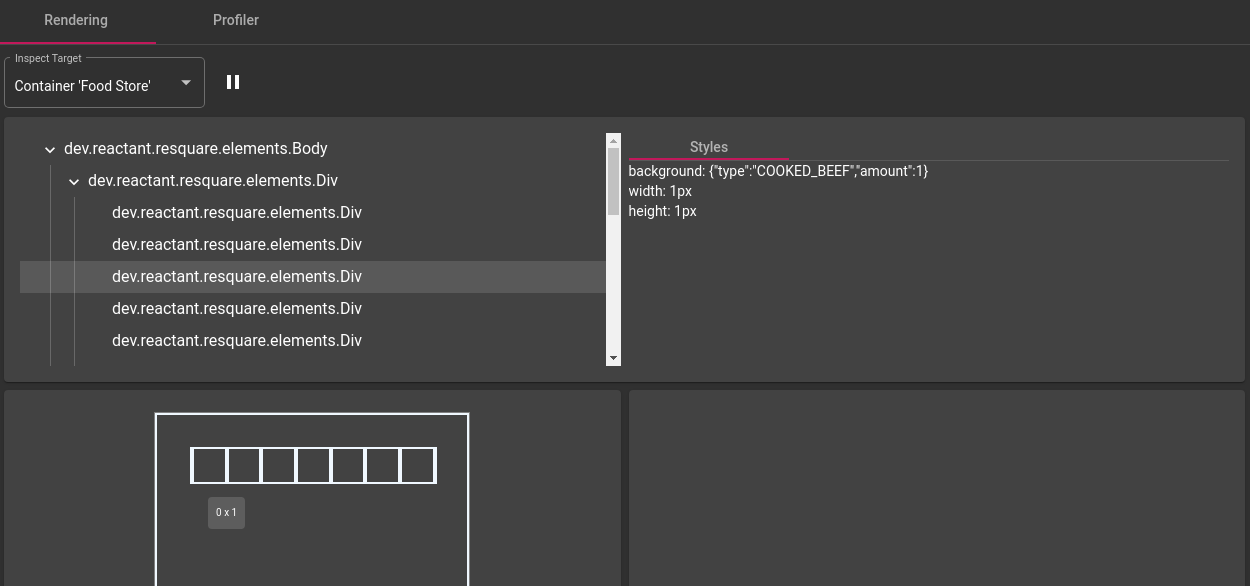
If you hover on the Div elements, you will find that some of them the width become 0, but some of them are still 1.

To get more details on why it will render like that, we can simulate the style with CSS on the browser.


As the above result showed, all width of the item buttons become smaller than 1 slot, therefore some item buttons gone after pixelated.

The reason that makes the item button smaller is that, by default, div style is flexWrap.noWrap() and flexShrink = 1f.

  • flexWrap - control will the children wrap into multiple lines when space is not enough
  • flexShrink - control will the element size automatically shrink when space is not enough

To fix the problem, we can set flexWrap.wrap() and flexShrink = 0f. In order to align all item on top of the container, we also need to add alignContent.flexStart().


It works! Now we can go back to our plugin and change the styles to wrap the children properly.

import dev.reactant.resquare.dom.*
import dev.reactant.resquare.elements.*
import dev.reactant.resquare.event.ResquareClickEvent
import dev.reactant.resquare.render.*
import org.bukkit.Material
import org.bukkit.inventory.ItemStack
private val styles = object {
val container = styleOf {
width = 100.percent
height = 100.percent
padding(1.px)
flexWrap.wrap()
alignContent.flexStart()
}
val foodItem = styleOf {
width = 1.px
height = 1.px
flexShrink = 0f
}
}
private data class FoodButtonProps(
val food: ItemStack,
val price: Double,
val onSold: (() -> Unit)? = null,
)
private val foodButton = declareComponent { props: FoodButtonProps ->
val handleClick = { event: ResquareClickEvent ->
if (withdraw(event.whoClicked, props.price).isSuccess) {
event.whoClicked.inventory.addItem(props.food)
props.onSold?.invoke()
}
}
div(DivProps(
style = styles.foodItem,
item = props.food,
onClick = handleClick,
))
}
data class FoodPrice(val food: ItemStack, val price: Double)
data class FoodStoreAppProps(
val foodPriceList: ArrayList<FoodPrice>,
)
val foodStoreApp = declareComponent { props: FoodStoreAppProps ->
useCancelRawEvent()
val (foodPriceList, setFoodPriceList) = useState(props.foodPriceList)
val handleFoodSold = { index: Int ->
foodPriceList.removeAt(index)
setFoodPriceList(foodPriceList)
}
div(DivProps(
style = styles.container,
item = ItemStack(Material.WHITE_STAINED_GLASS_PANE),
children = childrenOf(
+(foodPriceList.mapIndexed { index, foodPrice ->
foodButton(FoodButtonProps(
food = foodPrice.food,
price = foodPrice.price,
onSold = { handleFoodSold(index) }
), key = "$index")
})
)
))
}

Awesome, we have finished our first Resquare UI!

Summary#

By finishing this section, you may already have some idea of what can Resquare make. Here is just a part of Resquare, for more information, you can check the specific section.

Remember to join our discord to share your experience!